| |
MorphTrack Manual
Table of continents
Introduction
MorphTrack is a LightWave 3D plugin designed to give you easier control while animating facial expressions.
MorphTrack is a set of tracks that each represent one morph. It has a timeline at the bottom with an advanced zooming system.
To understand what MorphTrack does, it could also be described as a "Morph Sheet" or "Morph Table".
What MorphTrack allows you to do is view and set the values of the morphs you want to animate at all times at one time.
MorphTrack is a custom object plugin meaning that it gets applied to an object in layout.
The interface consists of four main parts: the setup interface, the advanced timeline, the morph tracks, and some additional buttons.
To install MorphTrack, add the supplied "MorphTrack.lsc" and "MorphTrack_Short.lsc" files to Layout using the "Add-Plug-ins" option.
Using the "Edit Menu Layout" feature, you can also add "MorphTrack" to your Layout menu.
Load an object with endomorphs such as the supplied "Mr. Lips" and apply MorphTrack to it from the menu,
or by selecting it from the custom object plugin dropdown menu.
Important note: MorphTrack setting get saved and loaded with your scene. When Layout loads your scene, it loads MorphTrack before it loads MorphMixer so any morph channels won't be visible.
If things were left to be so, it wouldn't function correctly, so it therefore applies MorphMixer again.
Once the scene is loaded, you may want to get rid of the added MorphMixer.
Each part of this manual may be viewed in video format as well, by clicking on the video link next to the topic title.
. . .
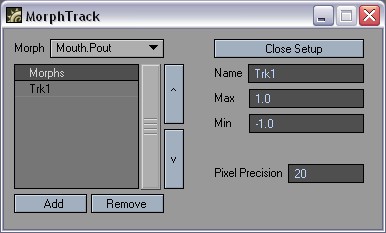
The Setup Interface
[video: avi (~2.20Mb)
mov (~1.293Mb)]
The setup interface is from where we select the morphs we want to be represented with tracks.
It can be accessed by clicking on the "Setup" button at the bottom left of the interface.
Select a morph from the morph dropdown menu, and click on add to create a track for it.
After adding a morph, the next morph will be selected in the morph dropdown.
This way, if all the morphs are one after another, select the first one, and click "add" until they are all added.
Tracks may be moved up or down and for each track you can choose the name that will be displayed and the maximum and minimum values.
The Pixel Precision feild is where you can choose how detailed you want the morph display to be if you are in "Pixel Precision" display mode.
To close the setup interface, simply click on the "Close Setup" button.
. . .
The Morph Tracks
[video: avi (~2.32Mb)
mov (~1.913Mb)]
The next main part of the interface is the layers of tracks that represent each a morph that can be assigned to it.
Each track displays the value of the morph at any given time and the keyframes (red = TCB, blue = Stepped, purple = Linear).
These tracks aren't for visual purposes only. Clicking and dragging will change the morph value at the wanted frame. The values snap at 0, 100 and -100.
Keyframes may also be moved around by middle clicking or CTRL + clicking and dragging. Keyframes may also be removed by shift + clicking on them.
. . .
The Timelines
[video: avi (~3.04Mb)
mov (~1.751Mb)]
MorphTrack has two timelines. First we have a timeline at the bottom that starts and ends at the same frame as the Layout timeline.
Then we have another timeline above it that represents the start and end frame we want to work on.
This is a way of zooming into a section of the timeline with great ease and with no need to change numbers every time.
The bottom timeline has two controls that may be dragged that define the start and end frame for the zoomed in timeline.
Clicking and dragging in between the two will move the whole section in time. Clicking beyond them will move the closest control to that position.
Then there is the timeline on to which we zoomed in. We'll call it the 'internal' timeline. Clicking and dragging on it will move the cursor in time.
middle clicking (as well as pressing space bar) will add a marker to that frame and right clicking (or pressing -) will remove the marker.
Markers may also be added or removed when playing a preview. ALT + dragging on the internal timeline will pan in time and ALT + CTRL dragging will scale the time it covers.
. . .
The Additional Buttons
[video: avi (~3.89Mb)
mov (~2.06Mb)]
The last main part of the interface is the bottom row of buttons.
Starting from left to right, we have:
- "Play Forward", "Pause", "Play Backward"
- "Next Frame", "Previous Frame"
- "Next Marker", "Previous Marker"
The next button with a letter in it is the display type button. Some display types are more accurate than others, but they are also slower.
Clicking goes to the next type, whiile right clicking goes to the previous type. The different types are:
- "F" - Frame Precision: default display type. Calculates the morph value per frame.
- "K" - Keyframe Precision: calculates the morph value per keyframe.
- "A" - Accurate Precision: Calculates the morph value per pixel. The most accurate option.
- "P" - Pixel Precision: Calculates the morph value every given amount of pixels. This value can me changed from the setup interface.
The "Setup" button brings us to the last but not least main part of the interface: the setup interface.
Lastly, clicking on the vast space between the display type button and the Setup button will sync the in and out frames with Layout's.
. . .
|
|
|